Title | Making waterproof shopping bags | ||||||||||||
Objectives | ● To reduce the amount of cotton in the making of fabric products; ● To reuse old materials in order to make new composite materials; | ||||||||||||
Necessary resources | Cotton fabric (used clothing, rags, curtains), polyethylene film (used shopping bags), scissors, baking paper, iron, ironing board, beaker with water, dropper. | ||||||||||||
Time | 60 minutes | ||||||||||||
Step by step instruction: | 1. Cut a small piece of cotton fabric (6 × 6 cm)! 2. Cut a piece of polyethylene film smaller than the piece of fabric (for example, 5 × 5 cm)! 3. Place the cotton fabric on the ironing board and the polyethylene film on top of it! 4. Cover both materials with baking paper so that it completely covers both the polyethylene and the fabric! 5. With an iron heated to the temperature intended for ironing cotton, press it onto the surface of the paper and hold for about half a minute! 6. Remove the baking paper and let the fabric cool. Turn the edges of the fabric over! 7. Come up with a name for your resulting composite material and write it in the data recording table! Studying and comparing the properties of materials 1. Test the mechanical strength of cotton, polyethylene and the resulting composite material by stretching the materials! Record your observations in the data recording table! 2. Test the water resistance of cotton, polyethylene and the resulting composite material by placing a few drops of water on each material! Record your observations in the data recording table!
| ||||||||||||
Reflection: | Draw a conclusion about whether the assumption is confirmed by evaluating the properties of the new material compared to the properties of the original materials! …………………………………………………………………………………………………………………………………….. Why is there a need to create composite materials? ……………………………………………………………………………………………………………………………………..
How could the experiment be improved if it were done again? …………………………………………………………………………………………………………………………………….. |
Title | Formation of composite materials |
Objectives | ● To reduce the amount of coton in the making of fabric products. ● To reuse old materials in order to make new composite materials. |
Necessary resources | Cotton cloth (rags, curtains, used clothing, etc.), sodium silicate solution (silicate glue), porcelain bowl, 25 ml measuring cylinder, glass rod, filter paper, baking paper, scissors, iron, ironing board, crucible tongs, alcohol lamp, matches, beaker with water. |
Time | 60 minutes |
Step by step instructions | Composite material production 1. Measure 8 ml of sodium silicate solution with a measuring cylinder and pour it into a porcelain bowl! 2. Cut a piece of cotton fabric 5 × 5 cm and completely immerse it in the sodium silicate solution with the help of a glass rod! 3. After about 5 minutes, remove the fabric from the sodium silicate solution, place it between two sheets of filter paper and dry it! 4. Cover the fabric with a piece of baking paper so that it is completely covered! 5. Place the dried fabric on a base for ironing! Dry it while ironing! 6. Allow the fabric to cool and remove the baking paper! Turn over the furred edges of the fabric! Studying and comparing the properties of materials 1. Watch the teacher’s demonstration! Record observations in the data recording table! 2. Light the alcohol lamp and place a beaker of water next to it (for fire safety)! 3. Hold the piece of cotton cloth soaked in sodium silicate close to the flame of the alcohol lamp, holding it in crucible tongs! Record your observations in a data recording table! |
Reflection | Draw a conclusion about whether the assumption is confirmed by evaluating the properties of the new material (flammability) compared to the properties of the original material (flammability)! …………………………………………………………………………………….. |
|
| …………………………………………………………………………………….. …………………………………………………………………………………….. …………………………………………………………………………………….. …………………………………………………………………………………….. How could the experiment be improved if it were done again? …………………………………………………………………………………….. …………………………………………………………………………………….. …………………………………………………………………………………….. …………………………………………………………………………………….. |
Title | Sorting and recycling of household waste |
Objectives | ● To create awareness about household waste sorting and recycling, selecting and preparing waste for recycling, and creating waste diversion schemes. |
Necessary resources | Picture “Household waste management in Europe” (Appendix 1). Waste samples (collected by students). 3 boxes – blue, green, yellow (for example, painted cardboard shoe boxes), 3 A1 sheets, plastic, colored whiteboard markers. Interactive whiteboard (computer, projector). |
Time | 60 minutes |
Step by step instructions | 1. Think about the need to sort waste before recycling it. 2. Select waste samples, prepare for recycling. 3. Demonstrates, explains the selection of recyclable waste samples. 4. Discusses the difference in the composition of plastic, glass and paper. 5. In a group, arranges in the correct order and explains the schemes for recycling plastic, glass and paper waste. 6. In a group, write on one sheet of paper the possibilities for reusing materials. 7. Discuss about the possibilities for reusing waste generated in everyday life from the respective material. 8. In a group, write a benefit, argue for it. 9. Discusses the possible benefits for countries of increasing waste recycling and reuse. 10. Individually fills out a self-assessment sheet, reflecting on their own gains in this lesson on waste sorting and recycling. 11. Discusses, compares opinions. 12. A group representative presents their findings. |
Reflection | While preparing for this lesson, I learned that waste sorting and recycling ……………………………………………………………………………………. ……………………………………………………………………………………. ……………………………………………………………………………………. In this lesson I learned ……………………………………………………………………………………. ……………………………………………………………………………………. ……………………………………………………………………………………. |
| I would like to know more about waste recycling ……………………………………………………………………………………. ……………………………………………………………………………………. ……………………………………………………………………………………. I think my family will/will not separate their household waste in the future because ……………………………………………………………………………………. ……………………………………………………………………………………. ……………………………………………………………………………………. |
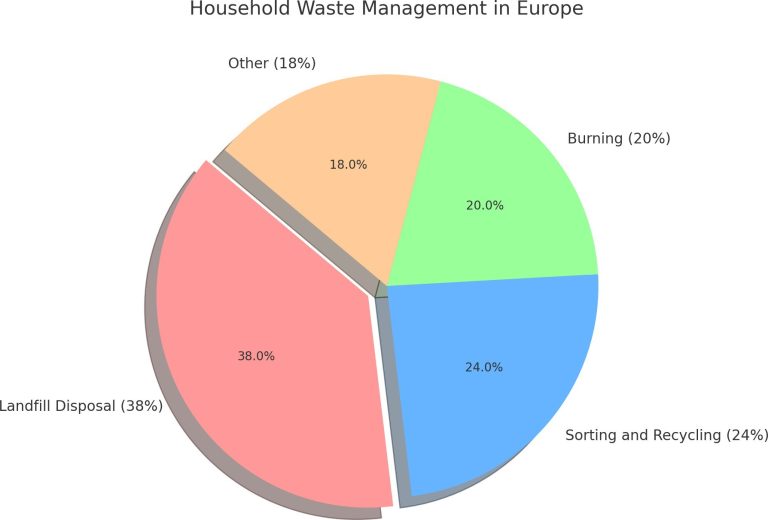
Appendix 1 “Household waste management in Europe”
Title | The making of bioplastic |
Objectives | ● To reduce the amount of plastic used; ● Using bio waste in order to make bioplastic products; |
Necessary resources | Hand blender, beaker (1000 ml), baking paper, tray, pestle and mortar for mass formation, glass rod, per sample – 3 ml 0.5 M hydrogen chloride (HCl), 2 ml glycerin, depending on the desired pH level, 0.5 M sodium hydroxide (NaOH), banana peels (at least 25 grams, can be more, 1 peel is 2 samples), dropper, water 500ml |
Time | 90 minutes |
Step by step instruction: |
|
Reflection: | What did you learn about the environmental impact of traditional plastics and how bioplastics can address these issues? ……………………………………………………………………………………………………………………………
How does using bio-waste, such as banana peels, contribute to sustainability? ……………………………………………………………………………………………………………………………
How could this method be adapted for larger-scale production? …………………………………………………………………………………………………………………………… |
Title | Hard and soft water | |||
Objectives | Reduce the number of household appliances that are damaged by built-up limestone. | |||
Necessary resources | 1M calcium nitrate solution, 1M sodium carbonate solution, 1M magnesium sulfate solution, 1M sodium phosphate solution, 3 test tubes, small funnel, filter paper, test tube rack, crushed laundry soap, spoon for measuring substances, sample of tap water, distilled water. | |||
Time | 60 minutes | |||
Step by step instructions | Experiment 1 1. Pour about 2 ml of calcium nitrate solution into two test tubes! 2. Add a little bit of ground household soap to one test tube, close the test tube with a stopper and shake vigorously! Then place the test tube in a stand! 3. Add about 2 ml of sodium carbonate solution to the second test tube! 4. Place an empty test tube in a stand! Place a funnel into it, in which a paper filter is placed, and pour the mixture obtained in step 3 into the filter! 5. Add a little bit of ground household soap to the resulting filtrate, close the test tube with a stopper and shake vigorously! Experiment 2 1. Pour about 2 ml of magnesium sulfate solution into two test tubes! 2. Add a little bit of ground household soap to one test tube, close the test tube with a stopper and shake vigorously! Then place the test tube in a stand! 3. Add about 2 ml of sodium phosphate solution to the second test tube! 4. Place the empty test tube in a stand and insert a funnel into it, in which a paper filter is placed! Pour the mixture obtained in step 3 into the filter! 5. Add a little bit of ground household soap to the resulting filtrate, close the test tube with a stopper and shake vigorously! Data recording table | |||
| Type of water | Water exposure with soap, foaming/non-foaming |
| |
Distilled water. |
|
| ||
Hard water containing calcium nitrate. |
|
| ||
|
| Hard water containing magnesium sulfate. |
|
|
Water after adding soda and filtering. |
|
| ||
Water after adding sodium phosphate and filtering |
|
| ||
| ||||
Reflection | Compare the effects of distilled water and hard water on soap! ……………………………………………………………………………………. ……………………………………………………………………………………. ……………………………………………………………………………………. Explain the observations for the effect of hard water on soap! ……………………………………………………………………………………. ……………………………………………………………………………………. ……………………………………………………………………………………. Determine the type of chemical reaction! ……………………………………………………………………………………. ……………………………………………………………………………………. ……………………………………………………………………………………. | |||